How to make a Temperature tower in Prusa Slicer

Trevor Haas
- Select either a single setting temperature tower (just nozzle temperature) or multi setting (temperature, retraction, extrusion multiplier, cooling fan etc).
- Depending on which temperature tower you are using, it could be as simple as adding some custom gcode which we supply for you or more complex
- I will walk you through setting up a multi setting tower and how to configure it
- Evaluate the print quality. We spent a bunch of time creating a quality rubric to help you score the quality of the print
- Update the print profile with the new settings and start printing things
AI 3D Printing Calibration
Upload a .3mf file and use AI to generate optimal print settings and optimize 5 print quality features at the same time
Overview and Background
What is a temperature tower?
A temperature tower is a method used to quickly test different print settings in one part. The idea is to print the same geometry or shape, multiple times with different print settings and compare the results, allowing you to quickly test and fine tune the quality of the print.

Some big advantage to a temperature tower over other methods are:
- Small amount of filament used (less waste)
- Its a short print time (10-30 min)
- Test multiple sets of settings at once in a controlled manor
In this article we will be going into the details of how to setup a temperature tower (plus other settings) in Prusa Slicer.
Required Files
Before we jump into the slicer we have to get a temperature tower stl.

Since we’re working with Prusa Slicer, you’ll need to decide which type of temperature tower you want to create. Here are your options:
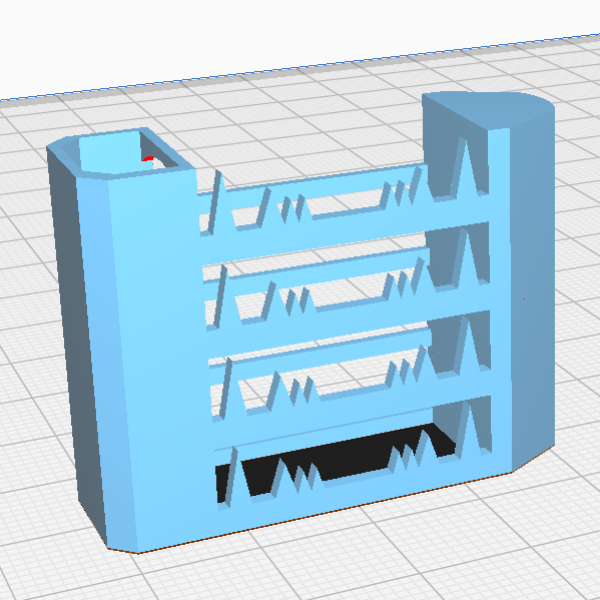
- If you just want to tune print temperature, use the all in inTinker-4-Level-all-in-one.stl
- If you want to tune print temperature and retraction settings like retraction speed and retraction length, use the 4 individual stl file
There are two separate STL options because they serve different purposes. If you’re only calibrating temperature, a single STL file is sufficient. However, if you want to include retraction settings in your calibration, multiple STL files are required. These files are stacked on top of each other, allowing you to assign unique retraction settings to each part by simulating different extruders in Prusa Slicer.
Single Part Temperature Tower (Temperature)

Multi Part Temperature Tower (Temperature & Retractions)

Creating the Temperature Tower (single .stl file)
After you have downloaded the stl file, we can start setting up the temperature tower in Prusa Slicer.
Download the Printables model for Free here
- Start a new project (.3mf) in Prusa Slicer with nothing on the build plate.
- Select the Print Settings Preset, Filament Preset and Printer Preset you want to calibrate before loading the model.
- Open the temperature tower stl you just downloaded and load it into the project.
- We will change the temperature for each level by adding what's called "Custom gcode".
- To do this, left click on the right side layer bar that shows the layers, then right click and select "Add Custom G-code". Here you can enter gcode to change the temperature once it hits that height.

- Add custom gcode to each of the levels by placing custom gcode at the following heights:
- Level 4 starts at 24.65mm
- Level 3 starts at 16.65mm
- Level 2 starts at 8.65mm
- Level 1 starts at 0.45mm
- Some common gcode for changing the layers are below. Waiting will stop the print until the temperature has hit the new target
- M104 S200; Set temperature to 200 (no waiting)
- M109 S200; Sets print temperature to 200C (will wait)

- To do this, left click on the right side layer bar that shows the layers, then right click and select "Add Custom G-code". Here you can enter gcode to change the temperature once it hits that height.
- That's it, your done. Now you can slice the model and print it.
- Skip to the Interpreting results section for more information on what to do after printing.
Creating the Temperature Tower (multiple .stl files)
Tuning retraction settings with temperature is a great way to dial in many aspects about your print. Since temperature and retractions are at the heart of the extrusion process (along with flow rate and cooling), you can remove a lot of print errors by tuning these settings together. It also makes it easier to evaluate and judge the part quality after its printed.
After you have downloaded the 4 stl files, we can start setting up the temperature tower in Prusa Slicer.
Since we cant add retraction settings as custom gcode, we have to use separate parts and assign each one them to a different extruder. This tricks Prusa Slicer into slicing the gcode with different retraction settings for each level.
- Begin by downloading the four separate STL files for the temperature tower: Level 1, Level 2, Level 3, and Level 4. Each level is slightly different and must be used in the correct order to ensure accurate calibration.
- Open Prusa Slicer, start a new project and set your Print Settings Presets, Filament Presets and Printer Presets and set the mode to "Expert Mode", you cannot do this in the other modes.
- Open the level-1 stl and center it on the build plate
- Now we will add the other 3 levels. Its important that you follow these steps because other wise you wont be able to set different retraction settings per level.
- Right click on the level-1 stl, and select "Add Part" then "Load".

- Load Level-2. You should now see an object with 2 parts nested inside it.

- Set the height location of level-2 to 12.4mm. Be sure to select the level-2 stl part before setting the height.

- Now do the same thing for levels 3 and 4. Set level 3 to 20.4mm and level 4 to 28.55mm.
- Right click on the level-1 stl, and select "Add Part" then "Load".
- You should now see a stack of 4 levels each as separate parts. Next we will add multiple sets of settings by simulating different extruders for each level. Go to the printers tab and under general add 4 extruders total. You should now see that you have 4 extruders.

- Next we need to disable filament setting overrides. Go the Filaments tab, and go to "Filament Overrides". Make sure the "Reaction Length" and "Retraction Speed" display N/A. This tells Prusa Slicer to use the extruder settings for retraction and not the filament settings.

- Now you can go back to the Printers tab and click on extruder 1. Here you can enter the retraction settings for level 1. Do the same with levels 2 through 4, each extruder corresponding to the associated level. Example: extruder 1 goes with level 1 and extruder 3 goes with level 3.

- Now go back to the plater screen and you should now see an "Extruder" column for the parts we just added. For each level, click on the level and assign it to the corresponding extruder. This will then use that extruders settings to print each level.

- Next we will configure the temperatures. This is the exact same process as the single file temperature tower, the temperature only temperature tower. On the vertical right side bar that shows the layers, left click, then right click and select "Add Custom G-code". Here you can enter the follow gcode at the heights listed below. For more details on this scroll up to the single part temperature tower, the process is exactly the same.

- Gcode
- M104 S200; Set temperature to 200 (no waiting)
- M109 S200; Sets print temperature to 200C (will wait)
- M106 S255: Sets the part cooling fan from 0-255PWM
- M221 S101; Sets the extrusion multiplier 101%
- Level heights
- Level 4 starts at 24.65mm
- Level 3 starts at 16.65mm
- Level 2 starts at 8.65mm
- Level 1 starts at 0.45mm
- Gcode
- You should now have a fully finished temperature tower that you can modify the settings with and print multiple combinations
- After you have selected which level and settings work the best, write them down. After you can remove the extruders, change the settings to the new ones, and save the preset to lock in the changes. When thats done you should now be able to print what ever you want with those settings.
Interpreting Results
After printing the part you are probably wondering how you determine which level is the best. Sometimes its obvious and sometimes it not. This is usually the most difficult and frustrating part, interpreting the results.
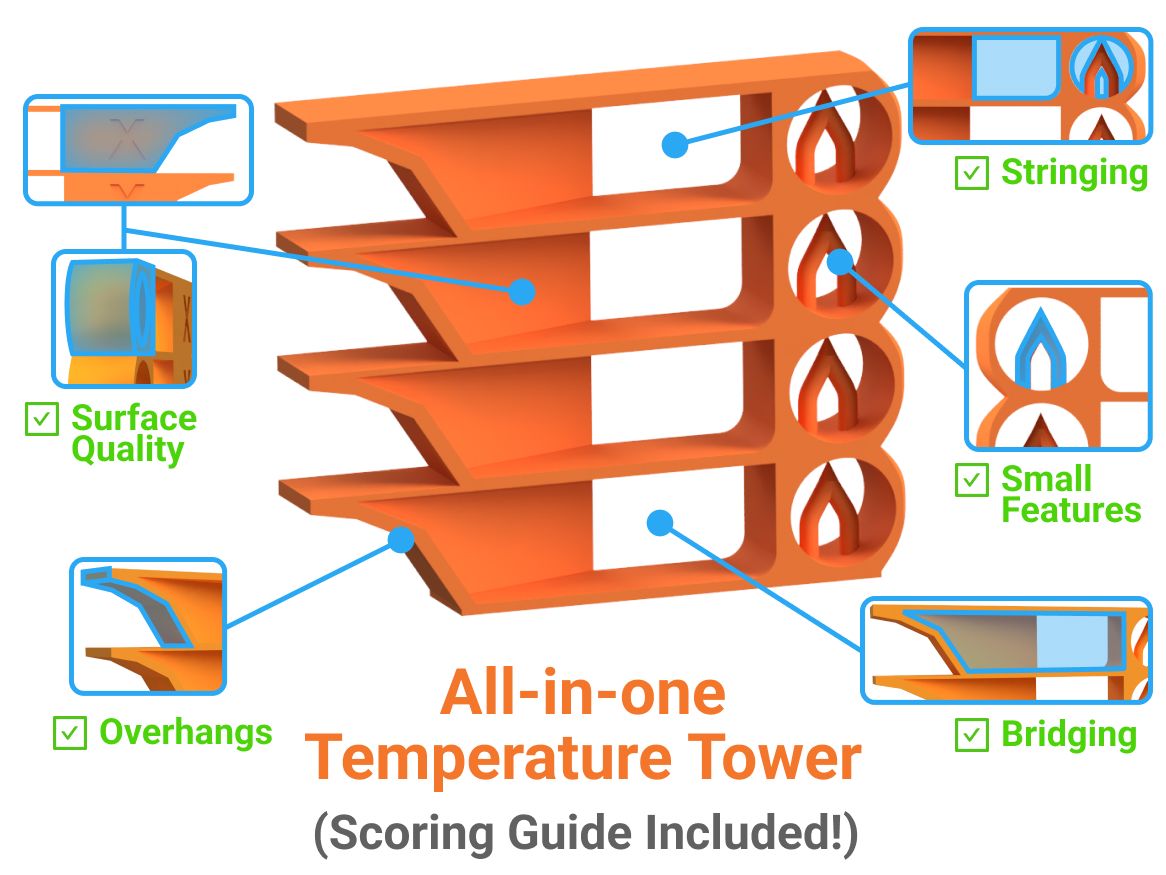
Luckily, if you have been using the parts from the All-in-One Temperature tower calibration, we have spent a lot of time building a scoring rubric to help you. The idea is to translate qualitative information into quantitative information, that way we can compare print quality. This rubric does just that. Its also free! So why not try it.
You can download the scoring rubric from the links that you go the parts from or by click here to start the download (.jpg) 
About the Temperature Tower
This temperature tower is used in inTinkers AI calibration system. Its part of the Baseline Calibration Module designed for using with new filaments you haven't tried printing yet or don't have a print profile for. The calibration tunes the follow features all at once.
- Stringing
- Surface Quality
- Small Feature Quality
- Bridging
- Overhangs
This part was designed based on the popular Smart Compact Temperature Tower used in the Orca Slicer Temperature Tower calibration. After printing literally hundreds of these towers with different filaments and printers, we made some modifications. This tower is mostly geared towards deceasing the total print time and filament usage, as well as making the part slightly more difficult to print. If you can print this well you will be able to print most other things well.

FAQ
Below are some common questions about doing temperature towers, and tuning.
Do I need a temperature tower for every new filament I use?
Yes, since different filament brands and batches can vary, a temperature tower ensures consistent quality with each new filament. At the very least, if your using a new filament, print a test part like a simple cube just to make sure everything is working right. It only takes a couple minutes and can save you tones of time later on.
Can a temperature tower help with other settings besides temperature?
Yes, you can test retraction, flow rate, and cooling along with temperature by using specific setups, like stacked STL files. This is a great way to save time and dial in the most important settings.
Are temperature towers compatible with all slicers?
Yes, but the setup process may vary. This guide focuses on Prusa Slicer, however we have another one for Cura right here.
Why do I need to enable expert mode in Prusa Slicer?
Expert mode unlocks advanced features like custom gcode and multi-extruder settings, which are necessary for complex calibration setups. If in other modes you wont be able to add additional extruders.
Related Articles
Learn more about inTinker

3mf Print Profiles
Save a Prusa Slicer 3mf file and upload it to inTinker to use those exact settings and presets in every calibation.

AI Calibration Pipeline
Calibrate all major features including Stringing, Surface Quality, Small Features, Bridging and overhangs all in the same print, all at the same time with AI.


